 By
By 
I love a loaf of crusty Italian bread from the bakery, but I wanted to recreate that same crispy crust and soft, chewy center at home. I tested different methods for getting that crisp crust and soft, chewy center, and landed on this simple recipe that uses just five ingredients while still giving you that classic bakery-style texture.
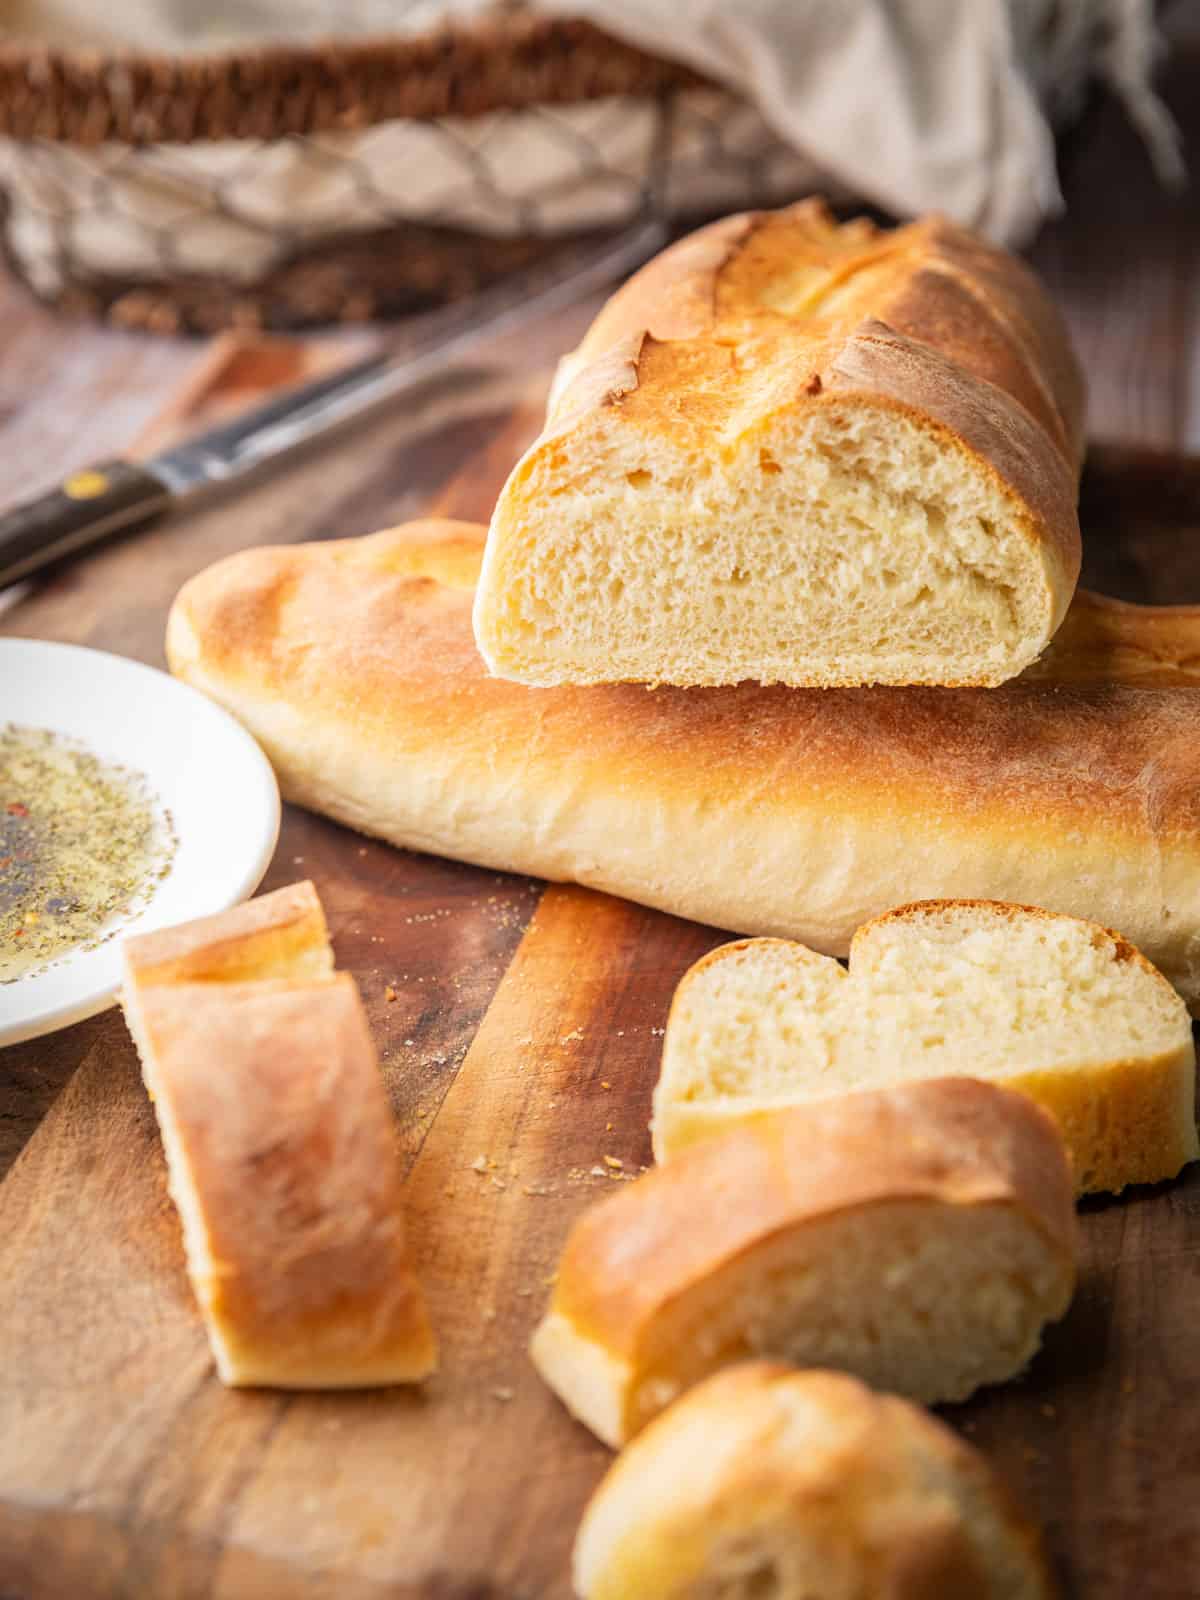
One of the biggest differences between a homemade loaf and bakery-style bread is the baking technique. The crispy crust on this Italian bread comes from a few simple techniques. Bread flour helps create structure, while steam in the oven keeps the surface flexible during baking so the loaf can expand before developing a golden, crisp crust.
I'll walk you through each step so you can get great results, even if it's your first time making homemade bread.
Jump to:
Ingredients for Homemade Italian Bread
This homemade crusty Italian bread comes together with just five simple pantry staples. Each ingredient plays an important role in creating the crispy crust and soft, chewy interior.

- Bread Flour - Bread flour has a higher protein content than all-purpose flour, which develops more gluten and gives this crusty Italian bread its chewy texture and sturdy structure. For the most accurate results, I highly recommend measuring the flour with a kitchen scale. If you don't have one, 20 ounces is about 4 cups, but start with 3½ cups and add more as needed so the dough stays soft and doesn't become too dry. All-purpose flour will work if that's what you have, but the crust and texture won't be quite the same.
- Active Dry Yeast - Active dry yeast needs to be dissolved in warm water and allowed to foam before adding the remaining ingredients. If you prefer, you can substitute instant yeast and mix it directly with the flour. It will also shorten the rise time slightly.
- Warm Water - The water should be about 110°F warm, like bath water, but not hot. Water that's too hot can kill the yeast, while cold water won't activate it properly. If you have a kitchen thermometer, it's the easiest way to check the temperature, but the inside of your wrist is a great guide too.
- Fine Sea Salt - Fine sea salt dissolves evenly into the dough and enhances the flavor of the bread. Kosher salt can be substituted, but use a little less since the crystal size is different. I don't recommend iodized table salt because it can leave a slightly metallic taste.
- Extra Virgin Olive Oil - A little olive oil adds flavor and helps create a softer, more tender crumb while still allowing the bread to develop its crisp crust. Regular olive oil works well too. If you're curious about the differences, check out my guide to the different types of olive oil.
Variations and Substitutions
- Stand Mixer - You can easily mix and knead this dough in the bowl of a stand mixer fitted with a dough hook. Mix the ingredients on low speed until the dough comes together, then increase the speed slightly and knead until the dough is smooth and elastic. This method saves a little time and works just as well as kneading by hand.
- Skip the Overnight Rise - If you're short on time, you can bake the bread after the first rise without refrigerating the dough overnight. The longer fermentation develops a deeper flavor and chewier texture, but the bread will still bake up with a delicious crust if you need it the same day.
- Different Shapes - Instead of making two baguette-style loaves, shape the dough into two round boules or one larger oval loaf. Just keep an eye on the baking time, as larger loaves may need a few extra minutes in the oven.
How to Make Homemade Crusty Italian Bread
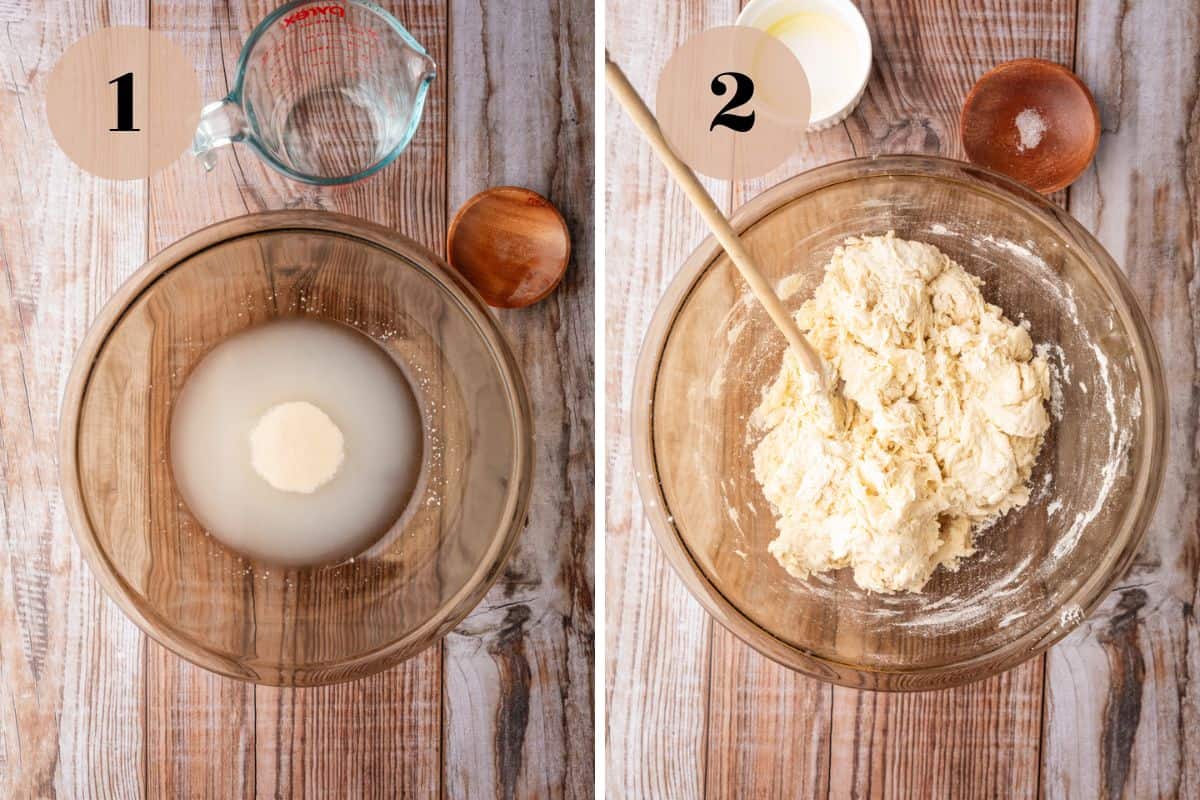
Combine the warm water and active dry yeast in a large bowl and let it sit for about 5 minutes until it's foamy. Add the bread flour, olive oil, and salt, then stir with a wooden spoon until a shaggy dough forms.
Turn the dough onto a lightly floured surface and knead for 5-7 minutes until it's smooth and elastic. Proper kneading develops gluten, which gives the bread its soft, chewy texture and helps create a strong structure for the loaf.
If the dough feels overly sticky, add a little more flour, one tablespoon at a time, until the dough is soft and slightly tacky, but not sticking to your hands.
Place the dough in a clean greased bowl and cover it with plastic wrap. Place the bowl in a warm, draft-free spot and let it sit for 1-2 hours until the bread dough has doubled in size.
If using the overnight rise, let the dough sit at room temperature for about 30 minutes before shaping to make it easier to roll and form the loaves.

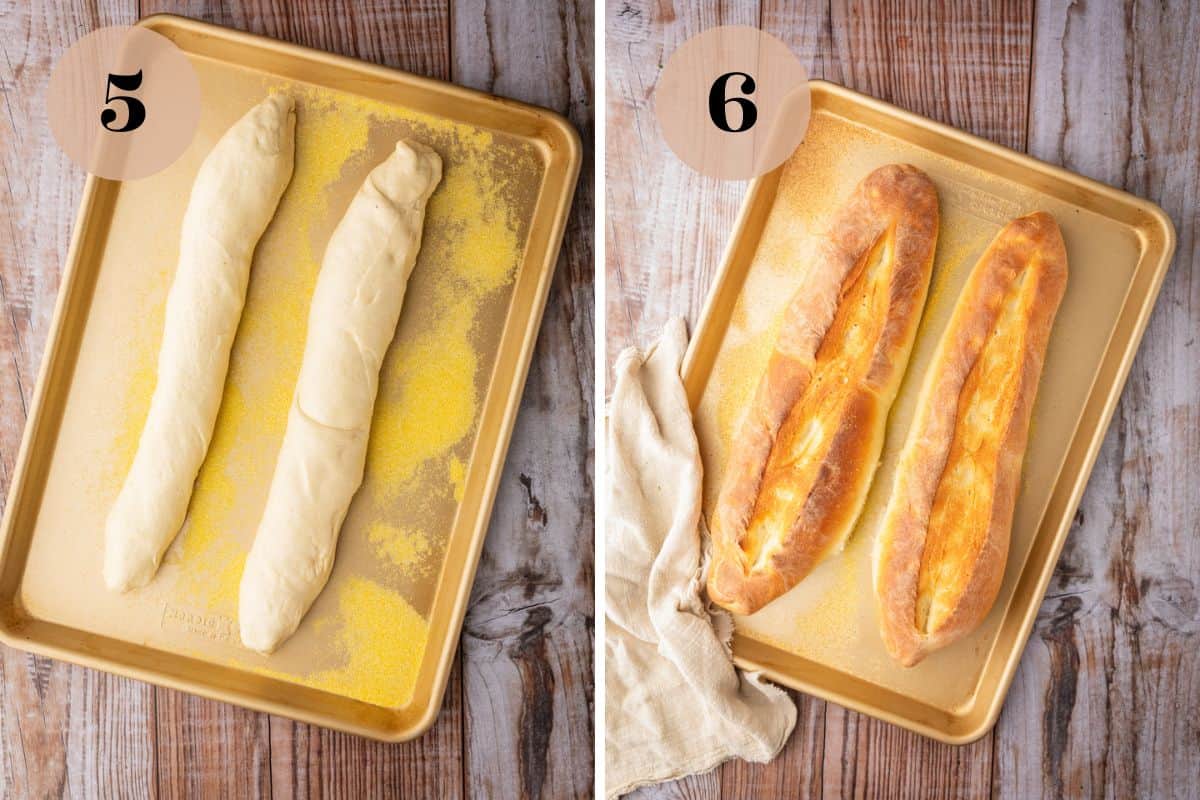
Punch down the dough and divide it into two equal pieces. Gently flatten each piece into a rectangle about 1-2 inches thick, then roll it up tightly from the long side, pinching the seam and ends closed to form two baguette-style loaves.
Place each loaf seam-side down on a baking sheet sprinkled with cornmeal or lined with parchment paper. Make sure the loaves have enough space between them on the baking sheet so they can expand during the final rise and baking. Cover loosely with a clean kitchen towel and let the loaves rise for 45-60 minutes, or until nearly doubled in size.
While the loaves are rising, preheat the oven to 450°F with a large cast iron skillet on the lower rack. Just before baking, score each loaf with one long slash down the center using a sharp knife or bread lame. This gives the bread a place to expand as it bakes and helps prevent the crust from cracking unevenly.
Place the bread on the center rack above the hot skillet. Carefully pour hot water into the skillet until it's about halfway full, then immediately close the oven door. The steam helps create the crisp, golden crust that gives this bread its bakery-style texture.
Bake for 18-20 minutes, or until the loaves are deep golden brown and sound hollow when tapped on the bottom. Transfer them to a wire rack and let them cool for at least 15 minutes before slicing so the crumb has time to set.
Make-ahead and storage instructions
This homemade crusty Italian bread is a great make-ahead recipe. I like to start the dough the morning before and let it rest in the refrigerator for a full 24 hours. The longer rise gives the bread more time to develop flavor and helps create a chewy texture.
The baked bread can be made up to 2 days in advance. Store the whole loaf loosely wrapped or uncovered at room temperature for 1-2 days to help maintain the crisp crust. Once sliced, wrap it tightly in plastic wrap or place it in a zip-top bag to keep it from drying out.
More Homemade Bread recipes
If you loved this homemade crusty Italian bread recipe, check out these other bread recipes that I know you will love too!
Recipe

Crusty Italian Bread
Video
Ingredients
- 12 ounces warm water, approximately 110˚F
- 1 teaspoons active dry yeast
- 20 ounces bread flour, approximately 4 cups
- 1 teaspoon fine sea salt
- 2 Tablespoons extra virgin olive oil
- cornmeal, for dusting the baking sheet
Instructions
- In a large bowl, combine the warm water and yeast. Stir to combine and let sit for 5 minutes until the yeast starts to foam.
- Add the bread flour, salt and olive oil and stir to form a rough dough.
- Turn the dough out onto a lightly floured surface and knead and 5-7 minutes until the dough is smooth and elastic.
- Lightly grease a large clean bowl with extra olive oil and add the dough. Turn it over in the bowl so it's covered with the oil and cover it tightly with plastic wrap. Place in a warm spot to rise 1-2 hours or until doubled in size.
- Move the covered bowl to the refrigerator for 12-24 hours to get the best flavor and texture to the bread.
- Take the dough out of the refrigerator and let it sit at room temperature for 30 minutes.
- Punch down the dough and split into two equal pieces.
- Roll each piece of dough out into a large rectangle that is about 1-2 inches thick. Starting on the long side, roll the dough up and then pinch the ends into a point to form a baguette shape.
- Place the two baguettes on a sheet pan that has been sprinkled with a little bit of cornmeal or lined with parchment paper.
- Cover the loafs lightly with a tea towel and let them rise in a warm place for 45-60 minutes until doubled in size.
- When the dough is almost done rising, preheat the oven to 450˚F, with a large cast iron skillet on the bottom rack of the oven.
- After the dough is done rising, remove the towel and use a sharp knife to run a 1 inch slit down the top of each loaf.
- Add the sheet pan with the loafs to the middle rack and then add enough water to the cast iron skillet below so it's filled about halfway.
- Immediately close the oven door and bake the bread for 18-20 minutes until golden brown. The bread should also have a hollow sound when you knock on the top of it.
- Transfer the bread to a cooling rack to cool for at least 15 minutes before slicing and serving.
Notes
- Stand Mixer - The bread can be mixed and kneaded in a stand mixer. Mix the yeast mixture with the other ingredients on low until the dough comes together. Increase speed to medium and mix and knead until smooth and elastic.
- No Overnight Ferment - Letting the dough sit in the refrigerator for 12-24 hours develops the best flavor and texture in the bread. In a hurry, this step can be skipped. Follow the instructions for shaping, the second rising, and baking the bread as directed.
- Shapes - Instead of shaping the dough into two baguettes, shape the dough into two rounds or one larger oval shape.


Kathleen
Just made this and cooled it down. Very delicious Italian bread. The best I have tried and I have tried many being 74 yrs old. I did add an extra 1/2 tsp. of salt simply because we like salt. Thank you a keeper go to for sure. I made 4 small loaves for sandwiches. So soft on the inside and crispy on the outside . PERFECT! I used no egg wash. Mmmm is all hubby could mutter ;-)Me too!
Amanda Scarlati
What a complement Kathleen. Thank you so much!
Amy
Delicious bread and a hot with my boys. Said it was the best bread they’ve tasted!
Will definitely make again. Followed the recipe precisely.
Amanda Scarlati
So glad your family enjoyed it! Thank you for trying the recipe!
Sonja F.
I tried this recipe yesterday and was very happy with the results! This bread has a good crust and dense texture, typical of authentic Italian bakeries. This recipe is definitely going in my recipe box!
Amanda Scarlati
Thank you Sonja, I'm so glad you enjoyed it!
Kristin
I have made this recipe multiple times and it has the best flavor and texture! Such an easy and delicious bread!
Amanda Scarlati
Thanks Kristin! I'm so glad you enjoy it!
TINA
Where's the sugar to activate the dry yeast? My first try without sugar didn't work. Had to use sugar. But you don't state this. How did you get 5* for not stating the obvious?
Amanda
Hey Tina, Thanks for your comment. You don't need sugar to activate yeast. It helps to jump start the process and make sure your yeast is alive, but isn't necessary. If your bread didn't work, it's possible that your yeast is going bad or you didn't give it time to rise. I, as well as others, have made this recipe many times without sugar and it has turned out just fine.