 By
By 

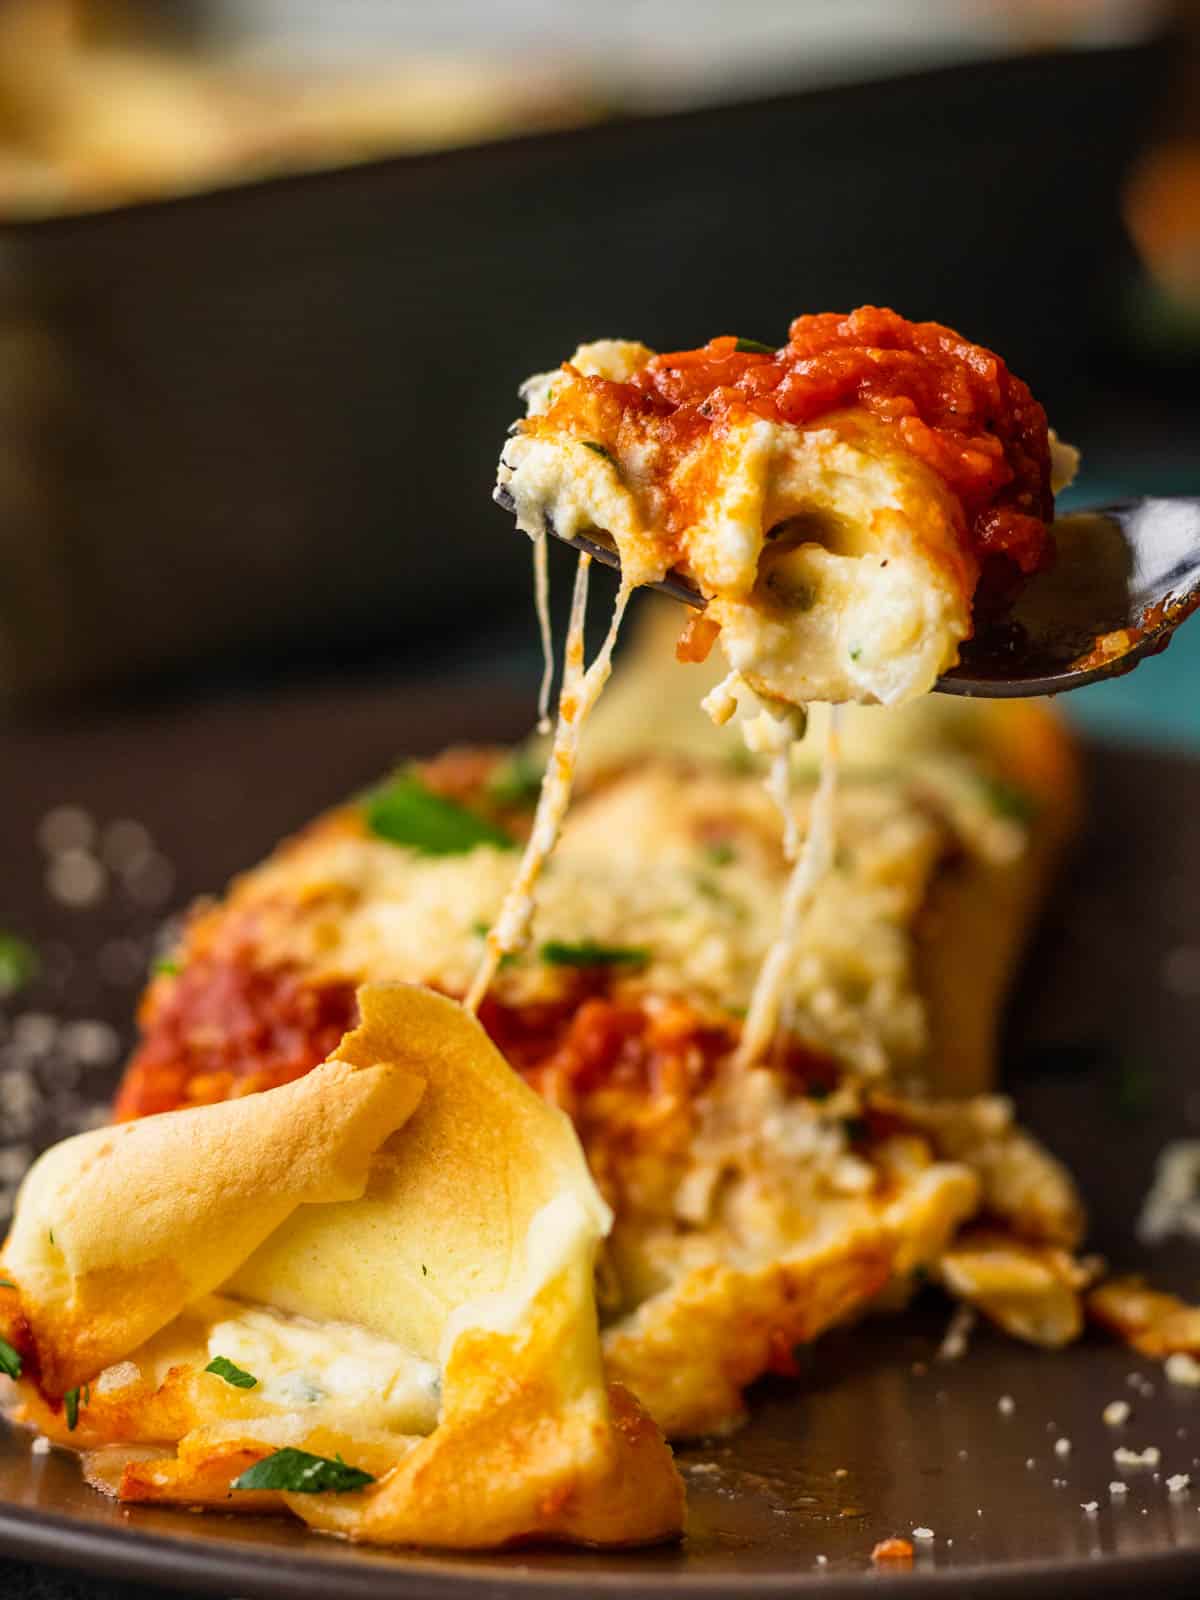
This authentic Homemade Italian Manicotti recipe is one of the best out there! With manicotti shells made from crepes and a rich ricotta cheese filling, this comforting pasta dish is perfect for Sunday dinner or the holiday season.
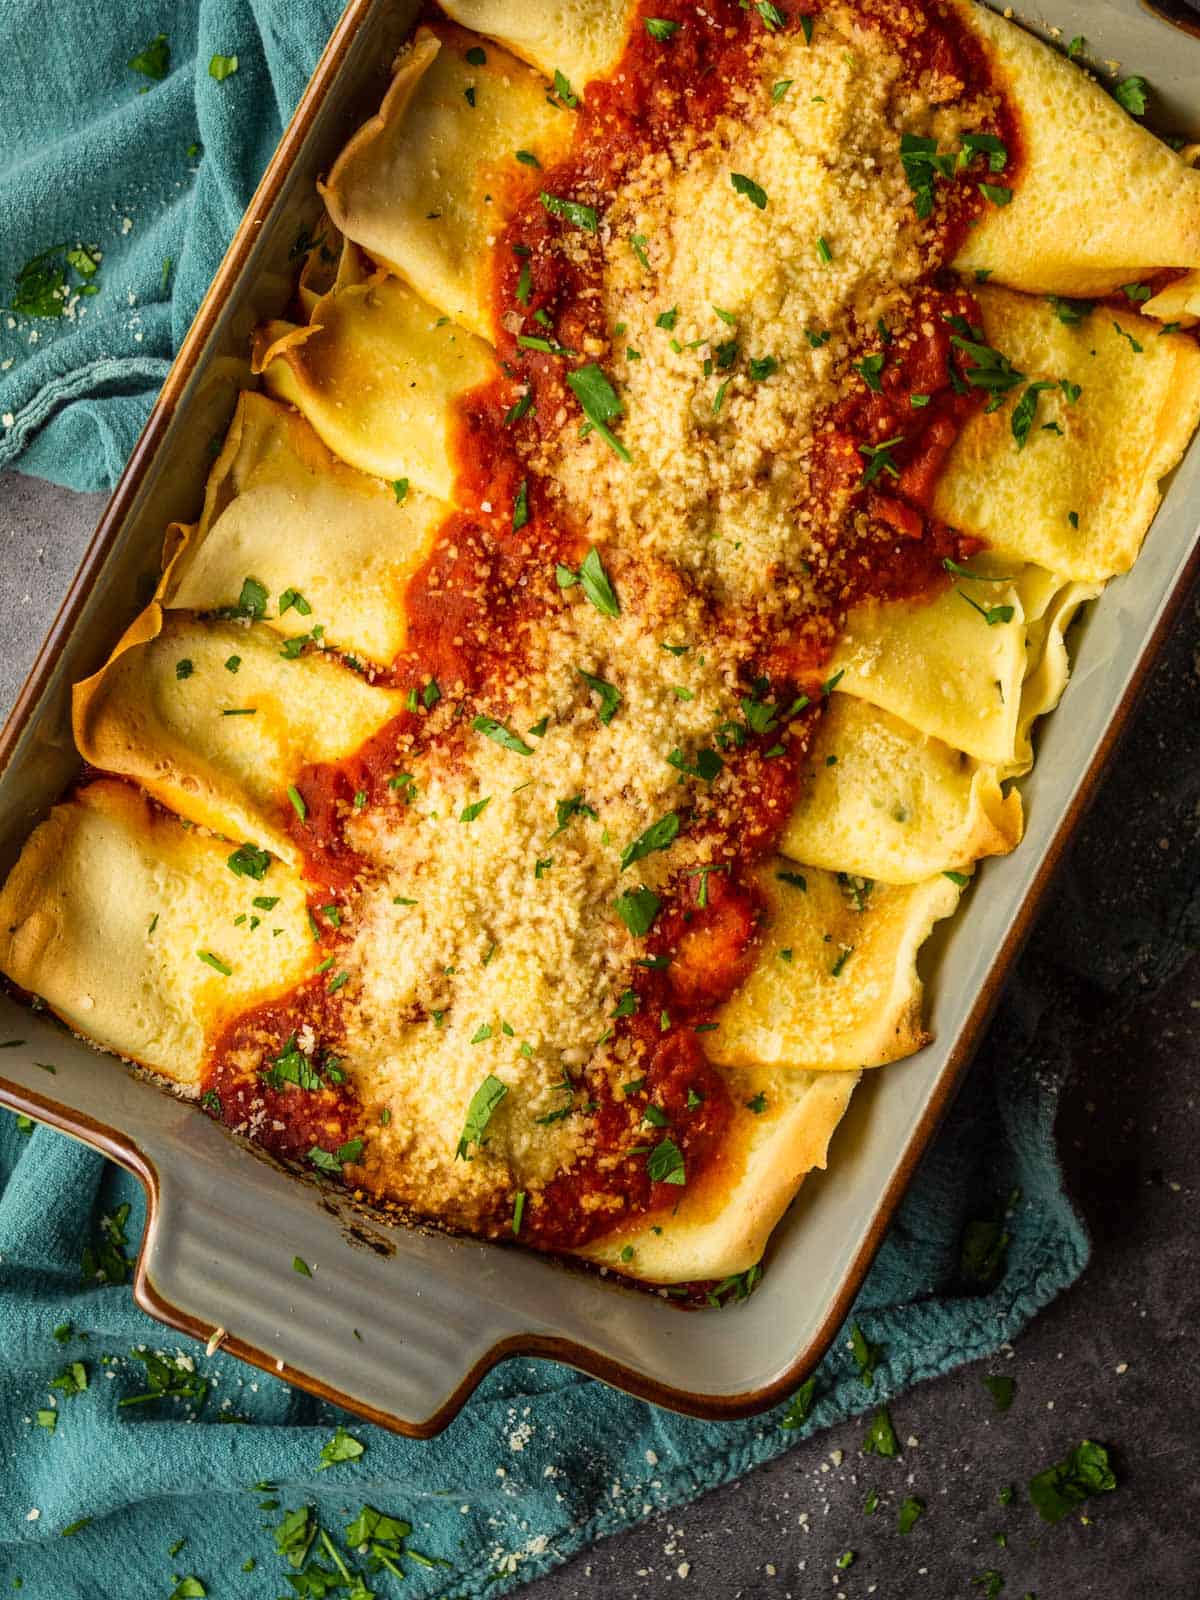
The best manicotti is made with crepes instead of store-bought pasta tubes. It makes the manicotti super delicate, with the perfect texture that creates a delicious, comforting dish the whole family will love.
Traditionally, authentic Italian manicotti is made with crepes, not pasta. They are filled with a ricotta cheese mixture and baked with a layer of sauce and cheese on top.
This authentic Italian manicotti recipe would be a great dish served with Italian seafood salad and struffoli on Christmas Eve or with Italian rice balls for Sunday family dinner.
Jump to:
🍅 Ingredient notes
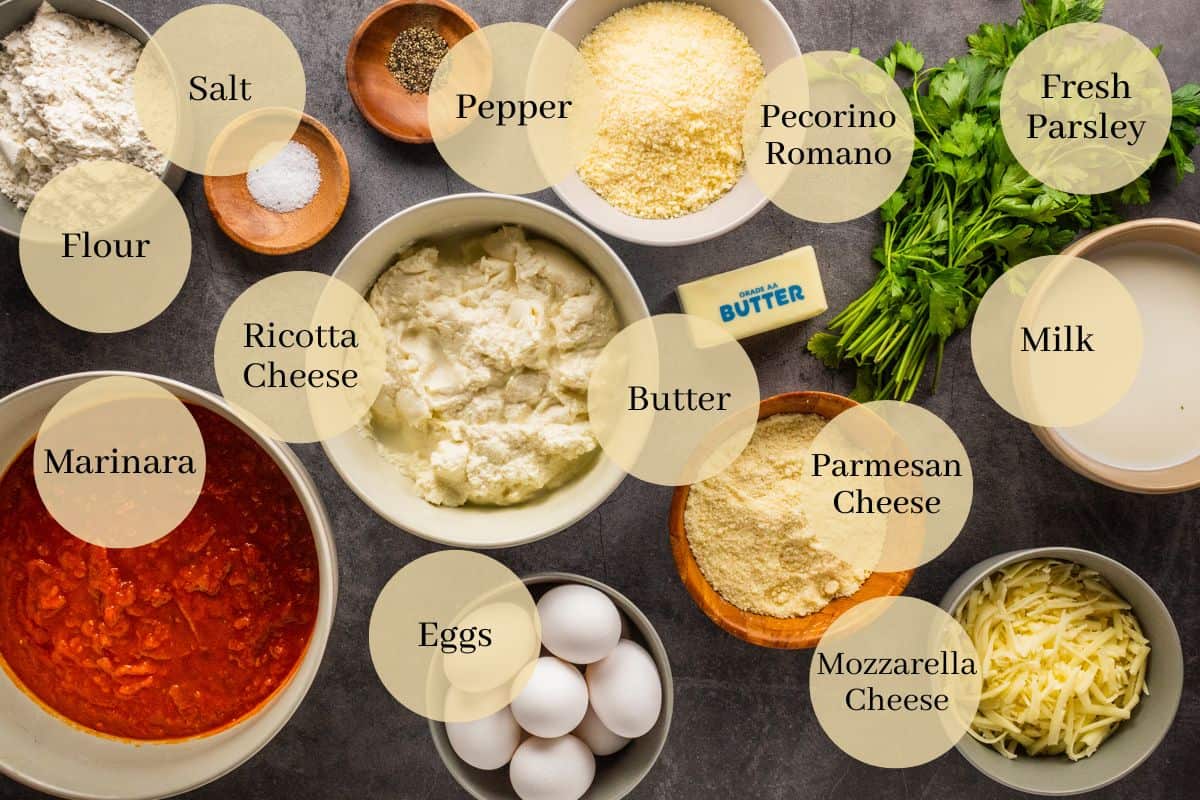
- Crepes - Instead of store bought manicotti tubes made from pasta, the shells are made from homemade crepes. Instead of making them homemade, pre-made crepes can sometimes be found in the grocery store. The filling recipe can also be used with store bought manicotti noodles.
- Cheese - The ricotta cheese filling is made using the following Italian cheeses - whole milk ricotta cheese, freshly grated parmesan cheese, and mozzarella cheese. I recommend using full fat, freshly grated cheeses if possible. Low fat, part skim, or pre-shredded cheeses can sometimes make the filling gritty or watery.
- Sauce - Use my homemade Italian Sunday Gravy Recipe or 30-Minute Marinara. Store-bought will also work just fine.
📋 Substitutions and variations
- Meat - Cooked ground beef or Italian sausage can be added to the cheese filling mixture for a heartier dish.
- Spinach - Add some chopped sautéed spinach to the cheese filling for a nice green color and extra veggies.

Reader Review
"We absolutely loved this . Excellent! I'm already planning on making this for friends. Great recipe!!!"
🔪 Step by step instructions
First, combine all of the ingredients for the crepe mixture in a blender and blend until smooth. Place the blender in the refrigerator to chill while the filling is made.
Next, combine the ricotta, mozzarella, and parmesan cheese in a large bowl with the parsley, eggs, salt, and pepper. Mix until well combined and place in the refrigerator to chill while the crepes are made.

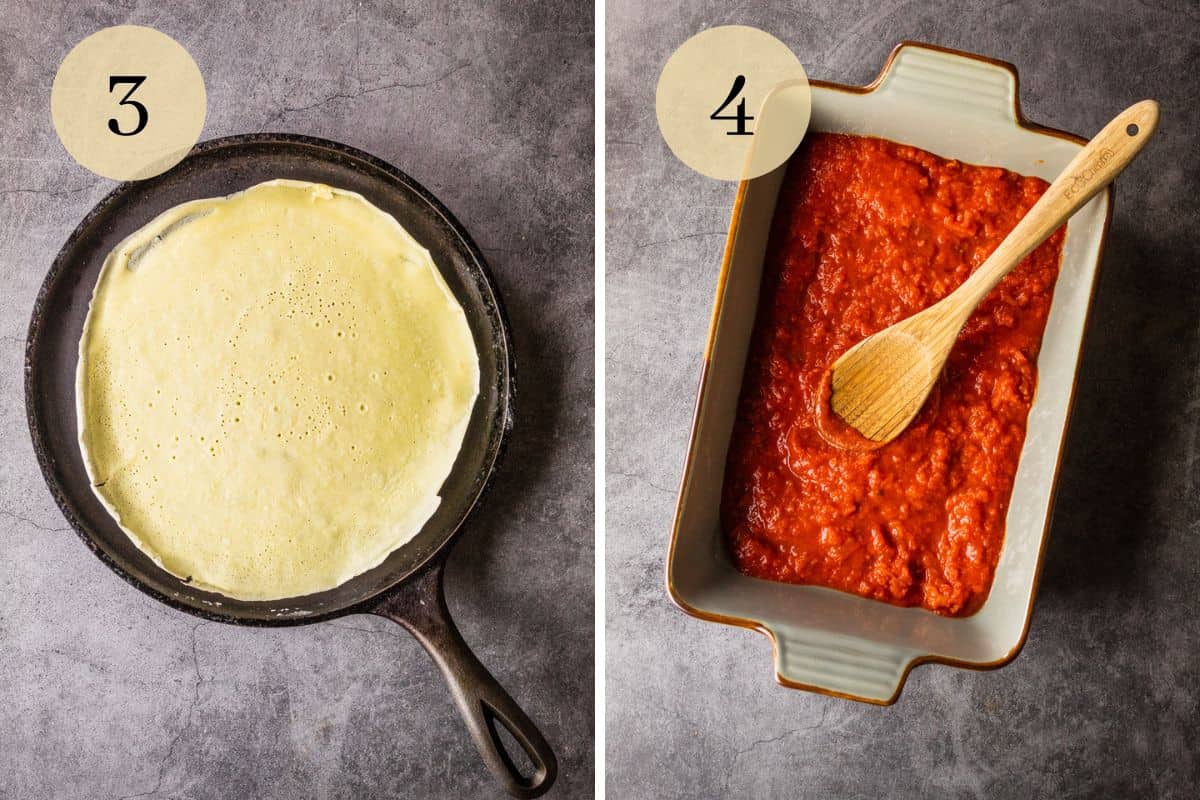
Heat a greased griddle pan or crepe pan over medium-low heat on the stovetop. Pour approximately ¼ cup of the batter on the pan while swirling it around so the batter evenly coats the bottom in a thin layer.
Cook the batter for 30-60 seconds until it's no longer shiny and the edges pull away from the sides. Gently flip and cook for another 15-30 seconds until just set.
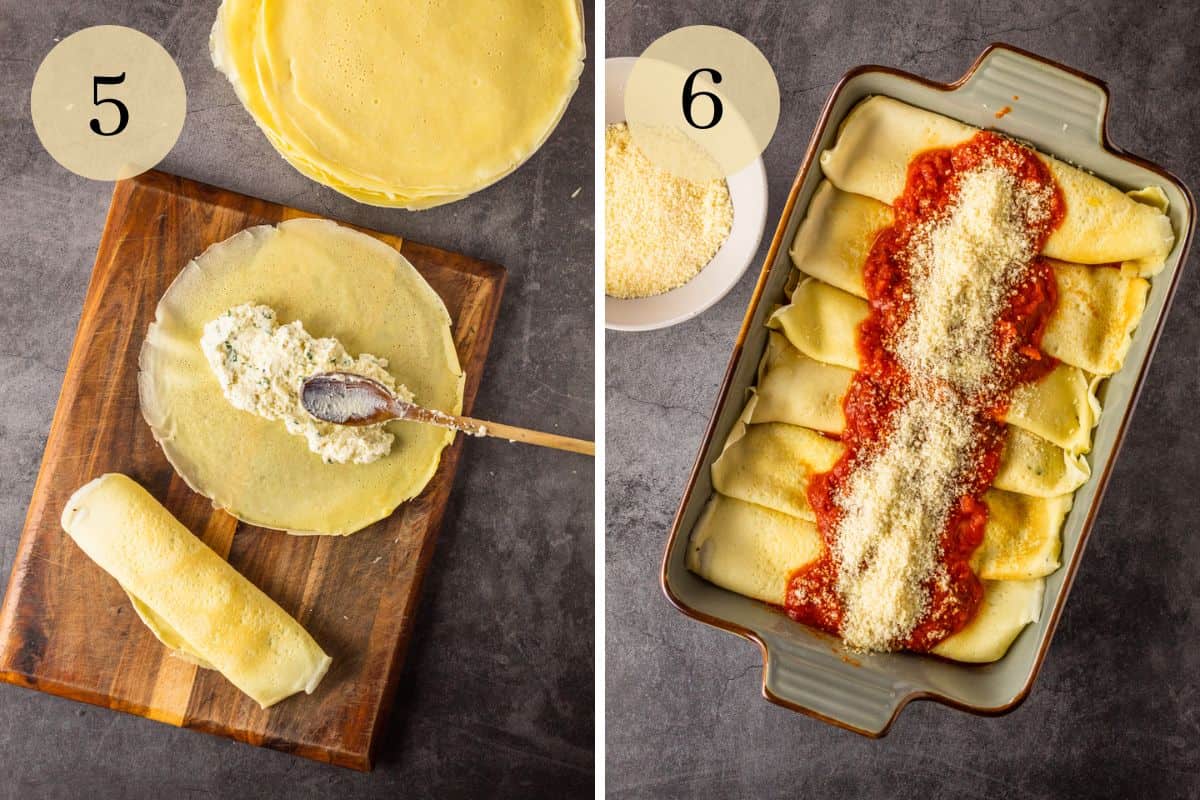
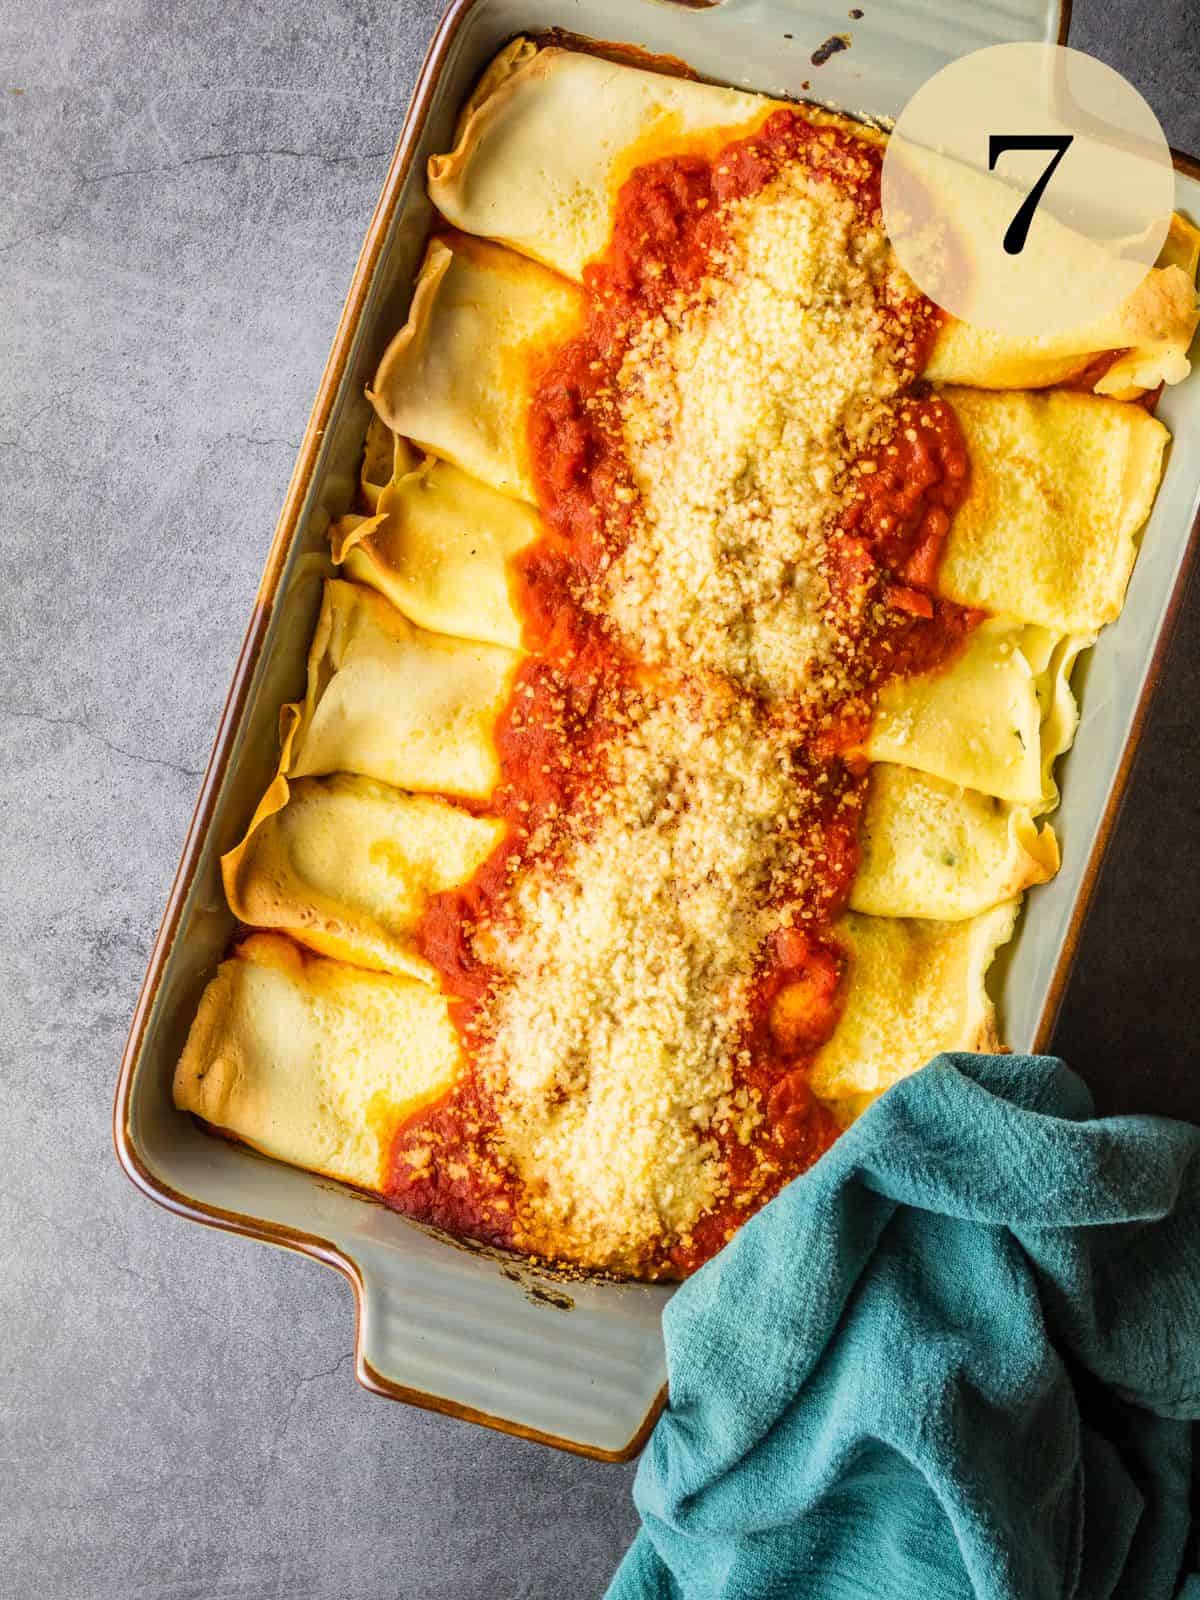
Repeat with the remaining batter until you have at least 6-8 crepes. Spread the bottom of a baking dish with 2 cups of sauce and then set it aside.
Spread approximately ⅓ cup of the ricotta filling down the center of each crepe. Roll them up and place them seam side down in the baking or casserole dish on top of the sauce.
Top the crepes with the cup of the remaining marinara sauce and then sprinkle with the pecorino romano cheese.
Bake the cheese manicotti in a 350˚ oven for 25-30 minutes until the sauce is bubbling and the cheese and crepe edges are lightly browned.
If you ever don't recognize a tool or skill that is mentioned, be sure to look it up in our Glossary of Cooking Terms and Definitions for more information.
⭐ Expert tips
- Strain the ricotta cheese wrapped up in a tea towel or cheesecloth over a bowl in the refrigerator for 2 hours or up to overnight. This will make sure our filling is not runny.
- Make sure to scrape down the sides of the blender when making the crepe batter so that all of the ingredients are well combined.
- A flat griddle type pan or crepe pan will make it easiest to flip the crepes. At a minimum, use something that is non-stick so they are easier to flip.
- Depending on the size pan used, the batter will make approximately 12-14 crepes. Approximately 6-8 filled crepes will fit in each 9x13" baking dish.
- Cook the crepes in a thin layer until they are just set. It's ok if they are lightly browned, but if they start to get too brown, lower the heat.
- Use a rubber spatula to flip the crepes gently so they do not tear. If they tear, you can still use them, they just may be a bit harder to roll up with the filling.
- Spread the filling all the way down the center of the crepes before rolling them up so the filling is evenly distributed.
⏲️ Make ahead instructions
- Crepes - The crepes can be made up to 24 hours ahead of time. Cool them completely and then store them on a plate wrapped in plastic wrap or in a ziptop bag until you are ready to fill the manicotti the next day.
- Filling - The filling can also be made up to 24 hours ahead of time and stored in an airtight container in the refrigerator.
- Manicotti (Fridge) - The unbaked homemade manicotti can be made up to 2 days ahead of time and stored in the baking dish, wrapped in plastic wrap in the refrigerator. Take the dish out of the refrigerator 30 minutes before baking or you may need an extra 10-15 minutes of cook time. The baked manicotti can also be cooled completely and stored wrapped in plastic wrap for up to 3 days. Reheat the pre-baked manicotti in the oven until heated through.
- Manicotti (Freezer) - Rolled manicotti with the filling can be placed on a sheet pan and frozen, then transferred to a ziptop bag for easy storage. The entire dish can also be assembled with the tomato sauce and stored wrapped in plastic wrap and then in foil in the freezer. Manicotti will last up to 2 months. Frozen rolled manicotti or the entire dish should be defrosted in the refrigerator before cooking in the oven.
🍅 More Italian comfort food recipes
If you loved this authentic Italian manicotti recipe, check out these other Italian comfort food recipes that I know you will love too!
Recipe

Authentic Homemade Italian Manicotti Recipe
Ingredients
Crepe Batter
- 1 cup whole milk
- 4 large eggs
- 1 cup all purpose flour
- ¼ teaspoon kosher salt
- unsalted butter, for greasing the pan
Manicotti
- 15 ounces whole milk ricotta cheese
- 1 cup shredded whole milk mozzarella cheese
- ½ cup grated parmesan cheese
- 2 Tablespoons chopped fresh parsley
- 1 large egg
- ½ teaspoon kosher salt
- ¼ teaspoon black pepper
- 3 cups old school italian gravy , or marinara sauce
- ¼ cup grated pecorino romano cheese
Instructions
- First, combine the milk, eggs, flour and salt in a blender and blend on high for 30 seconds. Scrape down the sides and blend for another 10-15 seconds. Place in the refrigerator to chill while the filling is made.
- In a large bowl, combine the ricotta, mozzarella, parmesan, parsley, egg, salt and pepper. Mix together until everything is well combined and then place in the refrigerator to chill while the crepes are made.
- Heat a griddle pan or crepe pan over medium low on the stovetop until hot and then and grease lightly with the butter.
- Pour approximately ¼ cup of the chilled batter in the pan while swirling it around so the batter evenly coats it in a thin layer.
- Let the crepe cook for 30-60 seconds until it's no longer shiny and the edges start to pull away from the sides.
- Gently flip over and cook an additional 15-30 seconds until just set. Remove and place on a plate and repeat with the remaining batter until you have 6-8 crepes.
- Preheat the oven to 350˚ and spread 2 cups of the sauce on the bottom of a 9x13" baking dish.
- Spread approximately ⅓ cup of the filling mixture down the middle of each crepe and gently rolll them up.
- Place the filled crepes seam side down in the baking dish on top of the sauce and sprinkle with the pecorino romano cheese.
- Bake the manicotti in the preheated oven for 25-30 minutes until the sauce is bubbly and the cheese and crepe edges are lightly browned.
Notes
- Crepes - Use store-bought crepes or manicotti pasta tubes instead of homemade crepes, if needed. Depending on the size of the pan used, the batter will make approximately 6-8 crepes.
- Cheese - Use full-fat, whole milk cheese and strain the ricotta cheese for a thick, smooth filling that isn't watery or gritty.
- Meat - Add cooked ground beef or Italian sausage to the filling.
- Spinach - Add chopped sautéed spinach to the filling.
- Make Ahead - The crepes and filling can be made up to 24 hours ahead of time. Cool and store in an airtight container in the refrigerator. The entire dish can be assembled up to 2 days ahead of time. Wrap the dish in plastic wrap and store it in the refrigerator. To freeze, wrap the dish in foil as well and store for up to 2 months. Individual rolled and filled manicotti can be frozen on a sheet pan and transferred to a ziptop bag for easy storage. Frozen manicotti should be defrosted in the refrigerator first. Baking times for make-ahead manicotti will be slightly longer.


Jennifer
Hi, I wanna make this completely from scratch and I have a lot of different types of flour is all purpose really what’s best for this recipe cause I have bread flour 00 pizza flour pasta flour if that would be better to make the crêpes with
Amanda Scarlati
Hi Jennifer - I generally use all-purpose flour, but 00 flour will make a lighter and more delicate crepe. You may need to add a little bit extra flour so the batter is not too thin, but it should turn out just fine. Bread flour will be too tough and all-purpose will just give them a bit more structure.
Kristina A.
it is very difficult to feed four people something everyone loves but this one of those meals! We make this at least once a week. Along with her sauce recipe it's absolutely delicious!
Amanda Scarlati
I'm so glad you enjoyed it! Thank you for making it apart of your dinner rotation 🙂
Ryan
We have made this recipe at least 10 times now, and everyone agrees it is fantastic! We usually like some meat with our dinner but have yet to do anything to tweak this recipe because its so good!
Amanda Scarlati
Thanks for your comment Ryan, I love hearing things like this! I'm so glad it's become a regular dish in your house.
Dwayne Ernst
Being a restaurant chef for 30+ years I've become quite picky on recipes. Gotta be authentic. This manicotti recipe is off the chart amazing and authentic. Thanks for sharing!
Amanda Scarlati
Thanks Dwayne, that means a lot to me. I'm really glad you love this recipe as much as we do!
Kelly
We absolutely loved this . Excellent! I’m already planning on making this for friends. Great recipe!!!
Amanda
Thank you so much, it's one of our family's favorites!
Michael
Used this recipe about 6 times now. These are so authentic! And taste great. Never leftovers ☹️. Making again tomorrow for my U.S. Army Grandson-in-law prior to deployment to Poland. Thanks for the easy recipe.
Made as written except using a light meat sauce (not gravy 🤪) made from home grown San Marzano tomatoes.
Amanda
Hey Michael! I love hearing feedback like this. I'm so glad it's become a family favorite, just like in our family. Mangia 🙂
Michael
Excellent easy practical recipe for authentic crepe manicotti. Works perfectly every time.
Amanda
Thanks Michael! I'm glad you enjoyed it!
Kim
Hi there, loomat adding meat, you mentioned it can be added with the cheese, would this be ground meat? Would it need to be cooked and then cooled before adding to the cheese?
Amanda
Hey Kim! Yes, you can add ground meat, such as beef, pork or italian sausage. I would cook it and drain it of any leftover grease and then add it to the cheese mixture. It doesn't have to be completely cooled, but I would let it cool down a bit so it doesn't melt the cheese mixture and make it watery. Enjoy!